
The site's hierarchy
Navigation
| M | T | W | T | F | S | S |
|---|---|---|---|---|---|---|
| 23 | 24 | 25 | 26 | 27 | 28 | 1 |
| 2 | 3 | 4 | 5 | 6 | 7 | 8 |
| 9 | 10 | 11 | 12 | 13 | 14 | 15 |
| 16 | 17 | 18 | 19 | 20 | 21 | 22 |
| 23 | 24 | 25 | 26 | 27 | 28 | 29 |
| 30 | 31 | 1 | 2 | 3 | 4 | 5 |
- Les premiers zoom de galaxies sont accessibles
- Le halo FOF 6133 de la boite Horizon L et le halo FOF 544 de Horizon S ont été resimulés avec plusieurs techniques de zoom. Il est important que chaque "zoomer" valide sa méthode, avant de lancer une campagne de zoom sur un plus grand cataloque.
- Les données de la simulation Mare Nostrum sont disponibles
- 34 snapshots jusqu’à z=4 sont accessibles sur horizon3 et sur le serveur de fichiers de l’IDRIS à la collaboration Horizon.
- Méso Machine HPC1 opérationnelle
- Depuis le 23 Octobre 2005, la Méso machine du site horizon est operationnelle. Elle correspond à 3 quadriprocesseurs avec chacun 64 Giga de RAM reliés par infiniband, ainsi qu’un access conséquent (sur une base de projet dédié) au reste de la ferme). Son acces est ouvert a toute personne de la collaboration ayant acces à la minigrille et qui en fait la demande a admin-minigrille
- http://
- Workshop Horizon le 14 et 15 novembre 2005
- Il aura lieu à Paris les 14 et 15 novembre 2005 (prévoir une nuit sur place). L’enregistrement est ouvert dans la rubrique "meeting!"
- http://
Quick start guide
- 1 Introduction
- 2 Public and administration interfaces
- 3 Publishing your first page
- 4 Inserting images and documents inside your page
- 5 Generalities about editing
1 Introduction
This document will guide you through the easy steps to publish a new page inside the Horizon Project web site.
2 Public and administration interfaces
The site has two different interfaces. A public interface, which is the site viewed by the visitors, and a private administration interface, password protected, dedicated to the authors & editors of the site. This administration interface allows the authors to intuitively edit the content of the site through a simple web page, without writing a word of HTML.
2.1 A brief view of the public interface
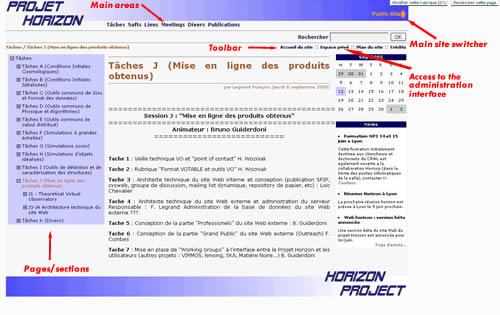
There are three main levels of navigation in the public interface.
- The Main sites (i.e. Internal vs Public)
- The Main areas of a site (Tasks, Softs, etc...)
- The pages/sections inside the areas
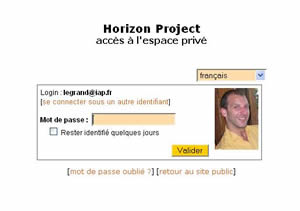
2.2 Connecting to the administration interface
You can access the administration interface through the public interface by simply clicking on the “Espace privé” link in the toolbar of any page. It will guide you to a login page. Just type your login, validate, type your password and you are in.
2.3 A brief description of the administration interface
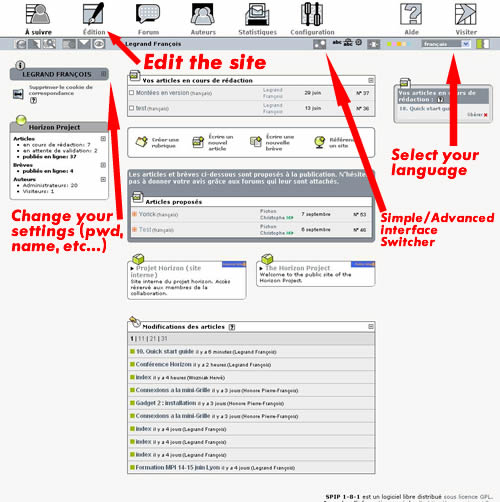
It’s recommended to switch to “Advanced Interface” so you will have access to all the options.
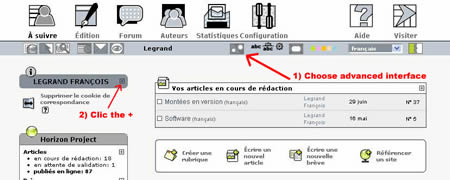
2.4 Changing your passwd
To change your password, first select the advanced interface and clic the + in front of your name. If your name and the + button are not visible, clic the "Launch pad" button (top left).
Then clic the "modify this author" button
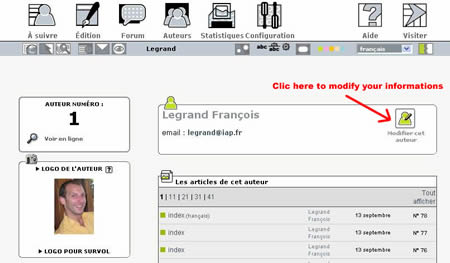
and change your password.
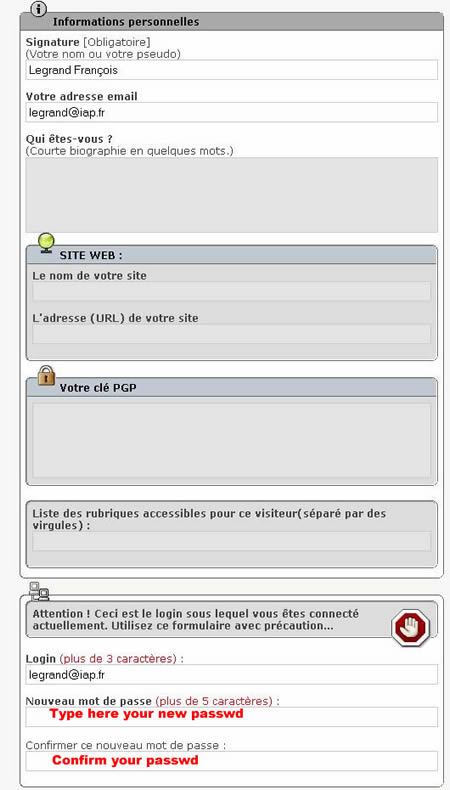
Don’t forget to validate once done !!
3 Publishing your first page
Follow the next steps to publish your first page:
- Connect into the administration area
- Choose “Site Edit”
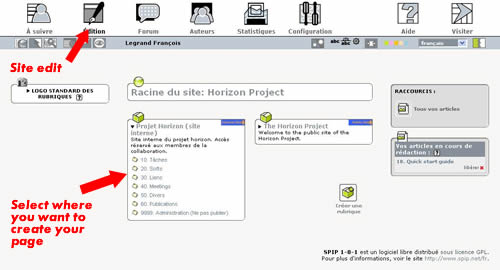
- Browse the site to reach the section where you want to add your page.
- Once you are in the correct section, choose “Write a new article”
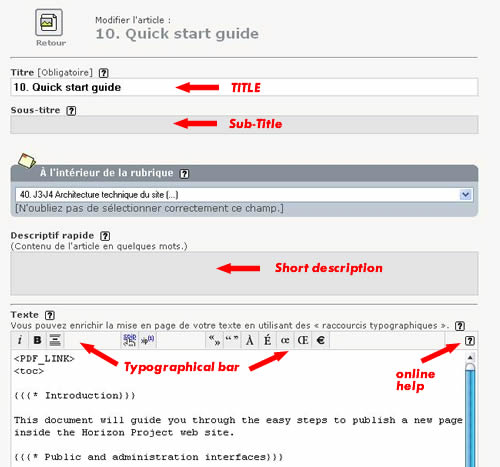
- Type the title, subtitle, brief description and text of your article.
- You can use some shortcuts to enhance your presentation. For example, text between two braces will appear in bold and in italic if between simple braces. You can also select part of your text and use the typographical bar to set it style (only available on some navigators). See online help for more details (e.g. how to create enumerated lists and so on).
- Save your work by clicking on submit at the end of the article.
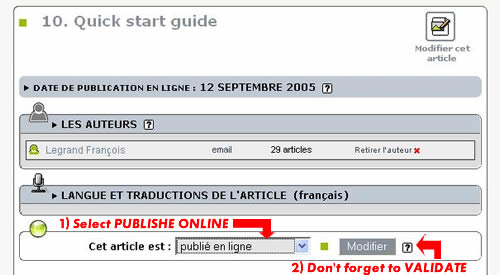
- At this stage, your article is saved but not yet published online. Only the author (i.e. you) can see it. You can quit, come back tomorrow, modify it as you want. Once you are satisfied with your work, you may want to make it visible by the whole world, i.e. publish it online. Whether you are a simple redactor or a great administrator you can ask for it publication (just click the button “Request the publication of this article”) or directly publish it online (select the option “published online” in the multichoice combobox and do not forget to click on the button modify).
- Go to the public site...
congratulations, you can see your brand new article.
4 Inserting images and documents inside your page
4.1 Inserting an image
You can easily add images or documents on your pages, but you first need to “save” your article. Once you saved your article, come back on it by choosing “modify this article”. To insert an image into your page, you first need to upload it on the server. To do so, click “add an image” when editing your article.
Then select your image on your disk and when finished click “upload”.
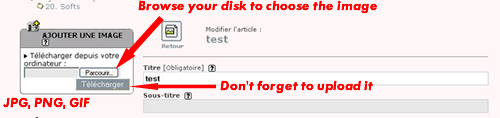
Specify the title of your image and submit.
You thus have to tell where you want your image to appear. Simply cut and paste the tag <imgXXX|position> inside the edition window.
position=left|center|right will align the image at the specified position and the text will “jump” around the image. Omitting “|position” will allow you to display the image where you put the tag (the text will continue without jumping any line). Validate... it’s done.

4.2 Inserting a document
The same as an image except that the shortcut is <docXXX> instead of <imgXXX> .
4.3 Inserting a large number of documents.
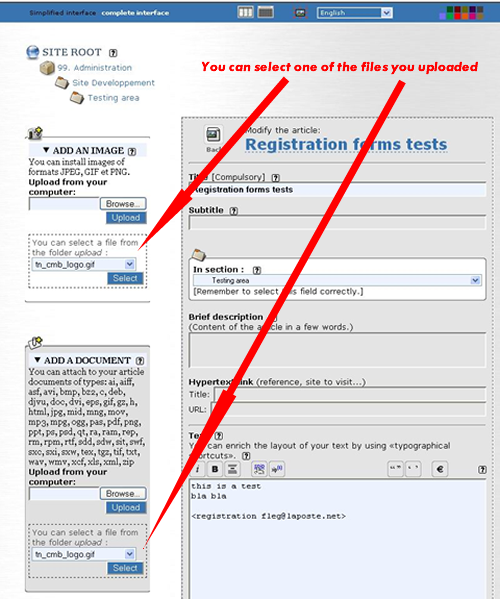
You may want to upload a large number of documents. In this case, uploading one by one is not very convenient. You should thus use an anonymous ftp connexion and upload all the files directly on the server. Once it is done, be sure that you selected the “complete interface” in the administration area. If it is done, you will see an additional box allowing you to select a file in the upload directory.
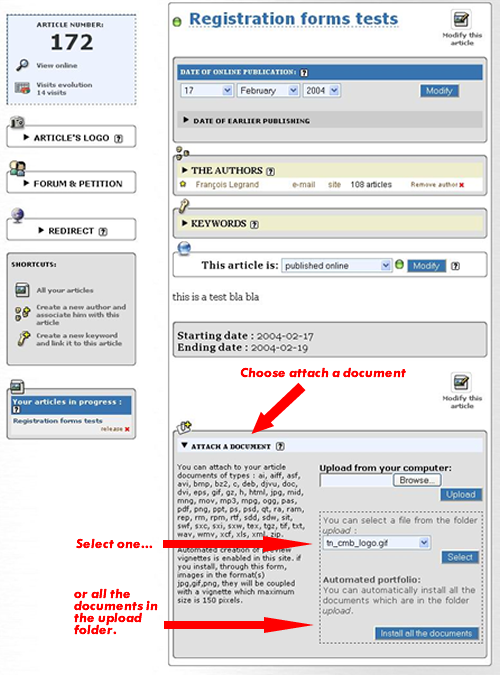
Moreover, you can also attach directly the full content of the upload folder. To do this, select the article (don’t click “modify this article”). You will see at the bottom of the page (always in the complete interface) a window “attach a document”. You can choose one or all the documents in the upload directory.
Once you finished, don’t forget to remove the files from the upload folder.
5 Generalities about editing
5.1 Kind of contributors
There are three types of contributors:
- Redactors: They can prepare a page, but cannot publish it online nor modify the structure of the site. Once the page they wrote is ready, they ask for it publication and an administrator to validate and publish it.
- Administrators restricted to one/some section(s): Can publish online their own pages or pages submitted by redactors in the section under their responsibility. For the other sections, same status as redactors.
- Administrators of the whole site: Can publish online any page anywhere in the site. Can modify the structure of the site (add, move, delete pages, sections, etc...).
5.2 Kind of objects
The site contain different kind of objects:
- An article = a web page
- A section = a collection of articles and subsections
- A news item = a short text (news)
5.3 Some rules
Some simple rules applies all over the site.
- An article is visible from the public interface if it has been published online.
- A section is visible from the public interface only if contains a published article (or a subsection containing a published article).
- The explanatory text of a section appears only in the administration interface (it is thus a kind of internal memo/description of the section).
- The text displayed for a section in the public interface is the one contained in the article named “index” in this section. In other words, if you create a section, we strongly encourage you to create immediately an article named “index” in this section and to publish it inline. This article will be displayed when the visitors will select the section and will also make the section visible (because it will contain a published article).
- Articles called “index” do not appear in the list of article of a section.
- Section names can start with a number followed by a dot and a space (e.g. “10. My Life”). This number will not appear in the titles displayed in the public site BUT the different sections at a same level will appear ordered by these numbers in the menus. It’s the simplest way to order sections within the menus.
5.4 Special tags
Special tags (i.e. specifics to this Web site can be used). You will find them here.
